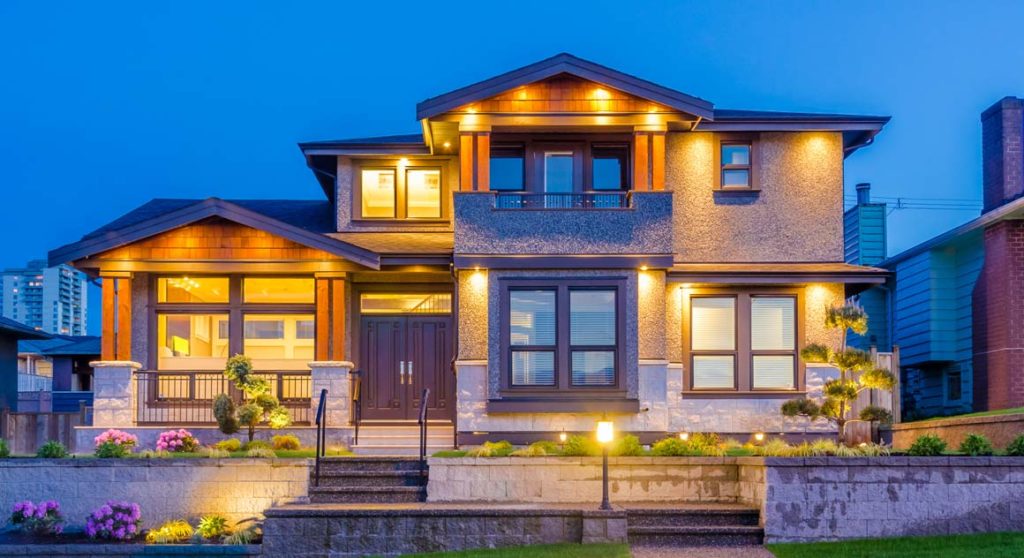
Do your outdoor activities end the moment the sun goes down? A well-planned landscape lighting design changes that. Beyond letting you use your pool, patio, and garden well into the evening, the right lighting plan improves safety on paths and steps, adds a layer of security around your property, and can noticeably boost how your home reads from the street after dark. The catch is that most landscape lighting disappointments don’t come from bad fixtures — they come from skipping the planning step entirely. This guide walks through how to plan a landscape lighting design properly, from mapping your property to deciding whether the project is a weekend DIY job or one for a professional.
A landscape lighting design is a planned layout of low-voltage or solar fixtures across a property, organized into zones based on purpose — safety lighting for paths and steps, accent lighting for focal points like trees or architectural details, and ambient lighting for spaces where people gather. A good design maps these zones before any fixture is purchased, accounts for how power will reach each zone, and matches fixture type and placement to the specific effect each area needs.
Getting this sequence right matters because landscape lighting is expensive to redo. Wiring gets buried, fixtures get mounted, and once a system is installed, moving a poorly placed light means digging it back up. Planning the zones, power layout, and fixture types on paper first — before buying anything — is what separates a lighting design that looks intentional from one that looks like fixtures were added wherever there happened to be an outlet.
1. Map Your Property Before You Buy a Single Fixture
Every solid landscape lighting design starts the same way: with a sketch, not a shopping list. Walk your property at dusk and note which areas actually need light for a reason — not just areas that would look nice lit up, but the ones where light does something functional. Pathways, front steps, and driveways fall into this “needs light” category because poor visibility there is a safety issue, not just an aesthetic one.
Once the safety zones are marked, go back through and identify the areas you want to highlight for looks: a specimen tree, a stone retaining wall, a water feature, or the architectural detail on your home’s façade. These become your accent zones. Finally, note where people actually spend time in the evening — a patio, a deck, a seating area near a fire pit — because these need ambient lighting rather than a single bright point source.
Sketch this on a rough outline of your property, even if it’s hand-drawn. Mark each zone’s purpose and note roughly how far each zone is from where power will originate (typically near the house). This single step is what most DIY lighting mistakes trace back to skipping — without it, homeowners tend to buy fixtures first and figure out placement later, which is backwards.
2. Choose the Right Type of Lighting for Each Zone
With zones mapped, the next step in any landscape lighting design is matching fixture type to purpose. There are three broad categories, and confusing them is one of the most common planning mistakes:
- Task lighting: Lighting for a specific functional purpose — illuminating a set of steps, a walkway, or a work area near a shed or garage.
- Accent lighting: Used to draw the eye to a specific feature — a tree, a wall, a piece of garden art — typically with a spotlight or narrow-beam fixture aimed upward or across the surface.
- Ambient lighting: Provides soft, general illumination across a space, like a patio or seating area, without creating harsh shadows or glare.
A design that only uses one of these three ends up feeling flat. A property lit entirely with task lighting looks like a parking lot; one lit entirely with accent spotlights looks dramatic but leaves gathering spaces too dim to use comfortably. The strongest landscape lighting designs layer all three, using task lighting for safety zones, accent lighting for two or three real focal points (not everything — over-highlighting defeats the purpose), and ambient lighting for wherever people will actually sit.
If you’re planning patio lighting specifically, ambient fixtures with a warmer color temperature tend to read as more inviting than the cooler, brighter light often used for security or task purposes. Matching your outdoor light’s warmth to the light already coming from your windows also helps the transition between indoor and outdoor space feel less abrupt.
3. Fixture Placement and Spacing: Where Most DIY Plans Go Wrong
Once zones and fixture types are decided, placement and spacing determine whether the finished result looks professional or scattered. A few principles consistently separate a considered landscape lighting design from an improvised one:
- Avoid the “runway” effect. Lining path lights up in a perfectly even, symmetrical row down both sides of a walkway creates a landing-strip look. Staggering fixtures on alternating sides, spaced roughly 6 to 10 feet apart depending on their output, reads as far more natural.
- Reveal, don’t flood. The goal of accent lighting is to bring out the texture, form, and depth of a surface — not to blast it with brightness. A low-angle light grazing across a textured stone wall reveals its dimension; a flat floodlight from the front washes it out entirely.
- Match beam angle to the target. A narrow spotlight on a wide garden bed looks like a single harsh circle of light. A wide floodlight on a single small tree overwhelms it. Beam width should roughly match the width of what it’s lighting.
- Don’t overdo it. A little landscape lighting goes further than most people expect. Over-lighting a property removes the contrast between light and shadow that makes a design feel intentional in the first place.
These are the details that most DIY landscape lighting ideas skip over, and they’re also exactly what a landscape lighting designer is trained to account for — not just where to put a fixture, but how its beam interacts with the surface, the surrounding shadow, and the other fixtures nearby.
4. Plan for Power, Wiring, and Automation Early
The electrical side of a landscape lighting design is where planning matters just as much as the visual layout. Low-voltage systems run on a transformer that steps down household current, and the transformer’s location affects the whole design: placing it centrally relative to your lighting zones keeps wire runs shorter, which reduces voltage drop and keeps fixtures at the far end of a run from appearing noticeably dimmer than those near the transformer.
Before purchasing wire, it helps to have your zone sketch finalized, since wire gauge and run length need to match the number and wattage of fixtures on that circuit. This is also the point where most guides recommend deciding on automation: timers, photocells (which trigger lights at dusk automatically), and motion sensors for security-focused zones like driveways or side entrances. Building these into the plan from the start is far simpler than retrofitting them into a finished system later.
If any part of your property is difficult to wire — a detached garden bed far from the house, for instance — solar fixtures can fill that gap without extending a wire run, though they generally provide less consistent brightness than a wired low-voltage system.
Seasonal change is worth factoring into the wiring plan too. Garden beds fill in as plants mature, which can shift how much a fixture is obstructed a year or two after installation, and freeze-thaw cycles in colder climates can shift soil around buried wiring over time. Leaving a small amount of slack in each wire run and using connectors rated for direct burial reduces how often a system needs troubleshooting down the line.
5. DIY vs. Professional Landscape Lighting Design: How to Decide
Not every landscape lighting project needs a professional designer, but knowing where the line sits saves both money and rework. The table below breaks down the factors that typically point toward one path or the other:
| Factor | DIY-Suitable | Better With a Professional Designer |
|---|---|---|
| Number of fixtures | Fewer than 10, on a single circuit | 10+ fixtures, or multiple zones/circuits |
| Property size | Small yard, single focal area (e.g. a front walkway) | Full-property plan spanning front, back, and side yards |
| Electrical scope | Plug-in transformer, no new wiring runs | New wire runs, multiple transformers, or tie-ins near main electrical service |
| Design complexity | Straightforward path or single-feature accent lighting | Layered design across multiple zones (task + accent + ambient) |
| Special features | Standard garden beds, walkways | Pool lighting, water features, complex architectural accents |
If your project falls mostly in the left column, a one-time design consultation can still be worth it even if you plan to install the fixtures yourself — it helps confirm placement before you dig, which is the step that’s expensive to undo. If your project falls mostly in the right column, working with a landscape lighting designer from the start avoids the mismatched, patchwork look that comes from expanding a small DIY setup piece by piece over several seasons.
It’s also worth being honest about how the project is likely to grow. Many landscape lighting projects that start as “just the front walkway” expand within a year or two to include the backyard, a deck, or a garden bed that wasn’t part of the original plan. If that kind of expansion seems likely, planning the full layout upfront — even if only part of it gets installed right away — makes it far easier to add zones later without redesigning what’s already in the ground.
Bringing a Landscape Lighting Design Together
A landscape lighting design that actually works is rarely the result of buying fixtures and placing them wherever looks good in the moment. It comes from mapping your property’s zones first, matching fixture type to what each zone is actually for, applying spacing and placement principles that avoid the most common DIY mistakes, and planning the electrical side — transformer location, wire runs, and automation — before anything gets installed. Whether you take this on yourself or bring in a professional designer, having this sequence in place before you buy a single fixture is what determines whether the finished result looks considered or improvised.
Frequently Asked Questions
What is the first step in landscape lighting design?
The first step is mapping your property into zones based on purpose — safety areas like paths and steps, accent areas you want to highlight, and ambient areas where people gather — before choosing or buying any fixtures.
How far apart should landscape lighting fixtures be spaced?
Path and accent fixtures are typically spaced 6 to 10 feet apart depending on their output, and staggered on alternating sides rather than lined up symmetrically, which avoids the “runway” look of an evenly spaced row.
What’s the difference between accent and ambient lighting?
Accent lighting highlights a specific feature, like a tree or wall, usually with a spotlight or narrow beam. Ambient lighting provides soft, general illumination across a space, like a patio, without creating harsh shadows.
Can I design my own landscape lighting, or should I hire a designer?
A simple layout with fewer than 10 fixtures on a single circuit, like a walkway or a single accent feature, is generally manageable as a DIY project. A full-property plan spanning multiple zones, new wiring runs, or features like pool lighting typically benefits from a professional designer.
Why does transformer placement matter in a lighting plan?
Transformer location affects wire run length to each fixture. A centrally placed transformer keeps runs shorter, which reduces voltage drop — the gradual dimming that occurs in fixtures further along a long wire run.
Should I use timers or motion sensors for landscape lighting?
Photocells that trigger lights automatically at dusk work well for most ambient and accent zones, while motion sensors are generally better suited to security-focused areas like driveways or side entrances. Both are easier to plan into a design from the start than to add later.
Plan Your Landscape Lighting Design With Land-Con
Land-Con has spent 25+ years designing and installing landscape lighting across Toronto and the GTA, working through this same planning process — zone mapping, fixture selection, spacing, and wiring — on properties of every size. If you’d rather have a designer walk your property and build the plan with you, call 416.504.5263 or email info@landcon.ca to book a consultation.